


How to Disable OneDrive in Windows 10


Removing the OneDrive Icon from the Windows 10 File Explorer
OneDrive is an integral part of Windows 10, lacking a simple uninstallation method. Users of Windows 10 will need to edit their registry files to disable OneDrive, so it is recommended that you set a system restore point and be extra careful when changing registry files. Â Â Â
To put things simply, OneDrive cannot be completely removed from Windows 10, at least not without potentially unwanted side effects, though it can be turned off. All you will need to do is follow these steps carefully, and you can disable Cortana. Â Â Â
Â
Entering the Registry EditorÂ
To enter into the Registry editor all you will need to do is type Regedit into Windows 10’s search bar, it will appear as the best match like in the image below. Then you can double click on Regedit and enter the Registry Editor.Â
Â
Â

Â
When inside the Windows Registry you will need to navigate to the following location.Â
Â
HKEY_CLASSES_ROOT CLSID {018D5C66-4533-4307-9B53-224DE2ED1FE6}Â
Â
 Â
Â
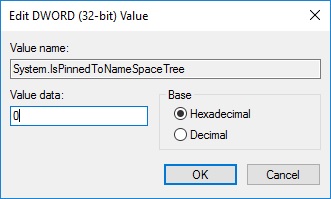
On the right-hand side, there is a DWORD called System.IsPinnedToNameSpaceTree. Double-click on this DWORD and change the Value data to 0 and click OK.
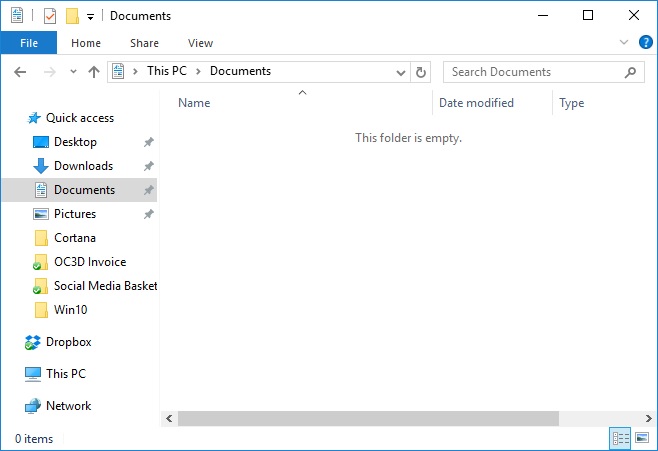
Restart your system and OneDrive will now be missing from the Windows 10 File Explorer.Â
Â
 Â Â
 Â
Â
You can join the discussion on OneDrive and anything Windows 10 on the OC3D Forums.Â
Â