


Coolermaster Hyper 212 Evo Review

Â
Instructions and Fitting
Â
Lets not beat about the bush here, if this page has a lot on it then i’ve not had a wonderful time fitting the cooler. First off, the instructions provided although magnificent in their multi language/multi processor splendour are just too darned small to be of any real use. Now as you might know from previous reviews, as I’m a bloke I will always class having to to look at instructions as some small failure. Not so much a failure in myself you understand (I am a bloke remember), but as a failing in the product itself in not being intuitive enough to assemble without instructions. Now assuming that the product is not intuitive (or I’m being a bit dim, which as i’ve already said couldn’t possibly be the case) and I’m left in the very awkward position of having to secretly read the instructions (usually involves locking the office door or waiting until the good lady has popped out less she discover me and begin to doubt my masculinity)…Where was I…ah yes, if I’ve actually got to resort to reading the instructions then they should at least be legible, and by legible I mean the diagrams should be large enough to see without the use of a scanning electron microscope. OK, so perhaps not quite as bad as that but there were a few elements of detail which I later picked up on which owing to the size of the pictures could not be discerned from the instructions.
 Â
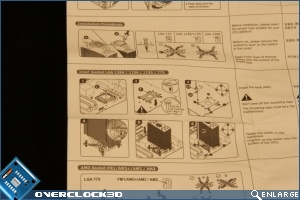

While I have the button labelled “RANT MODE” fully depressed lets talk about the fitting of the 212 EVO. It’s the same as the 212 plus, but boy could it have done with not being the same. It’s not that it’s over complicated, it’s not, it’s just that it’s a real faff and, as gently alluded to above is not made any easier by the lack of a clear set of instructions. Attaching the back-plate is a good example of where clear instructions and readable diagrams would have been helpful. The back-plate is held in place by 4 screws with hex heads on them. these hex heads accept another set of screws which pin down the front part of the mounting assembly (the thing that looks like a big X but is in fact an articulated scissor assembly). It’s reasonably clear that the back-plate has 3 sets of holes towards its outer margins, each of which is designed to be used for a different CPU socket. The back plate is not threaded, so it’s clear that these hex screws just pass through it to the other side. So you  hold the back plate in place and slip the hex screw through then lock it down with a hex nut on the back. Simple yes……Well No, because the hex screws won’t go through the back plate cleanly and actually have to be pushed through with a socket driver from the other side. which makes you think the quality of the engineering is a bit off as things don’t quite fit. At least this is what I thought until I came to dimount the cooler following the testing, at which point after dropping one of the hex bolts on the floor as I was having to force it back through the mobo from the reverse side I noticed that they’re actually flat on one side and devoid of thread on the flat side. Ah! I thinks, I wonder if this is relevant or just further bad engineering. On closer examination it seems that if, in assembly you line the hex screw up perfectly with the hole (which turns out not to be circular but ever-so-slightly D shaped) then the hex screw passes through with no problem. Be nice if the instructions showed this, maybe they do, but the diagrams are so small you’d never know.
And another thing…I’m not done yet, remember the X shaped thing. Well it’s articulated in the middle so it will collapse down slim to pass through the heat-pipes at the bottom of the cooler, opening up to the desired spread depending on which Chip you have fitted. It’s actually quite a nice design, problem is it feels so insecure and wobbly on the copper contact plate of the cooler that it takes a lot of convincing yourself to think its positively engaged and you can tighten the screws down.
I’m not intending to be harsh or overly critical of the fitting mechanism, It’s actually quite an elegant and simple solution, it’s just that it’s really let down by the unclear instructions. If you know how it all goes together, appreciate that the hex screws have a flat side that must be orientated correctly into the correspondeing hole and trust that although it might not feel sturdily mounted it actually is, then all is good.