Published: December 22, 2008 |
Source:
MSI |
Author:
Rich Weatherstone
MSI X58 Platinum Motherboard
BIOS
Upon POST we are greeted very briefly with an MSI Eclipse page, the Eclipse being the Platinum’s bigger brother. Immediately afterwards the familiar DrMOS screen pops up, inviting you to enter the BIOS by pressing the ‘Del’ key.
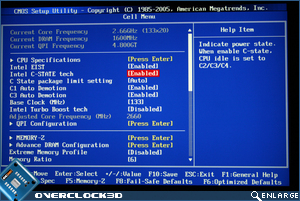
Like all enthusiast MSI boards, the main section of the BIOS is the ‘Cell Menu’ and this is the section we will be concentrating on today as it’s where you will find the overclocking settings of the MSI Platinum X58.
Straight away we an in unfamiliar territory with a host of new options not found on the LGA775 boards. C-State, Base Clock, QPI frequency and Turbo Boost Technology are all part of the new Core i7 BIOS found on most of the LGA1366 boards. Think of the Base Clock and QPI as FSB overclocking of old and you won’t go too far wrong. The C-State feature is a new feature of Core i7 and it achieved by making the power and thermal control unit part of the core logic and not part of the chipset as before.
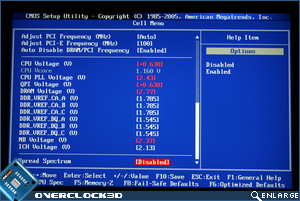
A host of voltage options are available on the Platinum and above (right) you can see the maximum allowed (not recommended!) voltages. I’d be interested to know why MSI thought that 2.3V on the NB was necessary, particularly as the memory controller is now ‘on die’. Like most of the settings here, excess is not a bad thing and it’s certainly nice to have the options available, even if it is unlikely that you will use them!
Moving on we see that at the stock Bclk of our i7 920 CPU we have 3 QPI frequencies to choose from along with 6 memory dividers. Unfortunately, when we first received the motherboard no amount of changing the dividers made any difference to the actual frequency of the DDR3 and it wasn’t until a new BIOS was released that we could change the frequency.
As well as the standard 4 timings, the advance timing menu offers a multitude of memory sub-timings that will allow you to get the most out off your shiny new triple channel kit. Above right we see the ‘Clockgen Tuner’. I don’t know why but I expected a dazzling array of new features here but I was left disappointed with a few basic clock skew settings.
Flashing the BIOS was not an easy task. I decided to use the M-Flash utility which is a feature of the BIOS and although it all looks pretty straightforward, the manual was little help. A few minutes of head scratching and I finally figured the combination of settings that worked, enabling me to flash the BIOS from a USB stick which worked a treat.
Above right we see the power saving ‘Green Power’ feature of the MSI board. While this is a good feature for those who intend on running the board at stock, power saving features can interfere with the stability an overclock so these settings were disabled for this review.
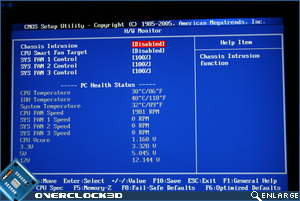
Last of all, we come to the Health and Power monitoring section of the BIOS. Three fan headers as well as the CPU fan can be controlled from here using percentages as a regulator. Once you have all your settings fixed you can then back these settings up to one of four available slots which is always useful.
Let’s move on to our test setup to see if these settings can overclock our Core i7 past its stock settings…