FOXCONN BlackOps X48 Motherboard
Motherboard Layout
Â
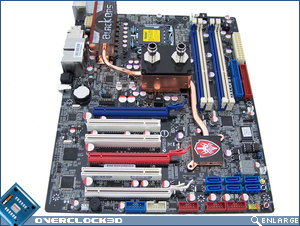
With the exception of the 4-in-1 northbridge cooling solution (which I will go into a little more detail shortly), the Foxconn BlackOps has quite a sedated and simple look to it. It is certainly a different beast on first impressions than say, the ASUS Rampage Extreme that we reviewed a short while ago. But don’t be fooled – this motherboard has grunt by the truckload, and provides more than enough voltage to reduce your hardware to puddles of molten silicon. The Foxconn BlackOps shares the now popular blue and white theme for the DIMM and PCI slots, and solid polymer capacitors expected on such a high-end motherboard. Let’s dive right in and make ourselves a little better acquainted with the motherboard shall we?
Â
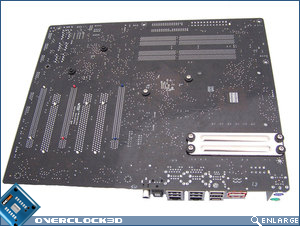
The rear of the Foxconn BlackOps motherboard is clean and for the most part uncluttered apart from the backplate of the VRM cooler. The heatpipe assembly that incorporates the voltage regulation heatsink, the North Bridge cooler and the South Bridge cooler are all attached via spring-loaded screws, instead of the spring-loaded plastic lugs that other manufacturers use. The spring-loaded screws allow for better contact and a stronger method of attaching heavier heatsinks.
Â
Â
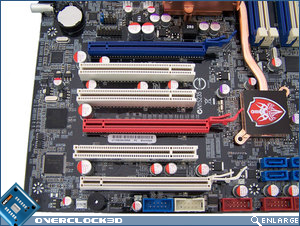
Starting off in the lower left hand side, the Foxconn BlackOps features three PCI slots and three PCI-E x16 slots. It is worth mentioning, though, that with the first two PCI-E x16 slots filled, the third will operate at PCI-E x4 mode. In most scenarios you will have access to at least two PCI slots and two PCI-E x16 slots for expansion cards. However, if running a Crossfire setup, this will be reduced significantly.
Â
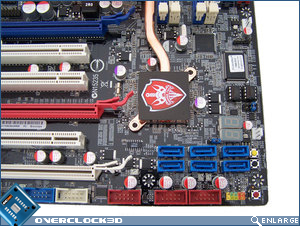
Along the bottom edge of the motherboard, Foxconn has included a speaker header, an IEEE 1394 port, a COM port and three USB 2.0 ports. In the far right hand corner there is also the front panel header and an IrDA connector should you have an infrared wireless transmitting/receiving device in your setup. Moving up the right hand side of the motherboard, Foxconn has included onboard Power, RESET and CLR_CMOS buttons which have become the norm for high-end motherboards
Â
The Foxconn BlackOps provides six SATA plugs, which should be more than enough for both bench work and those who wish to utilise the motherboard in the more traditional approach of mounting it in a high-end PC. Immediately above the SATA ports there is a CLR_CMOS jumper cap which can also be used to clear the CMOS memory via the more traditional way of shorting the pins. Two onboard digital debug LED’s have been included to assist with troubleshooting boot issues.
Â
Â
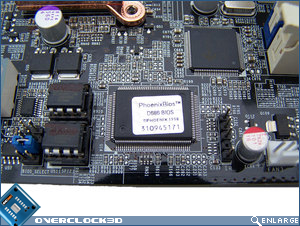
The Foxconn BlackOps motherboard has a dual-BIOS setup which is extremely handy for those times when things go horribly pear-shaped. The jumper pins next to the BIOS chips allow you to switch between a corrupted BIOS and over to the remaining working one.
Â
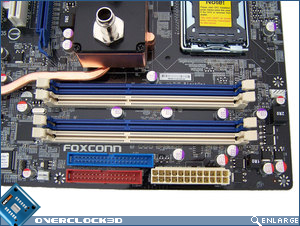
Moving further upward we can see the four DIMM slots. The Foxconn BlackOps is able to accommodate up to 8GB’s of memory in both single- and dual-channel configurations. It’s important to point out here that the DIMM’s locking mechanism can’t be fully opened when there is a graphics card present in the top PCI-E x16 slot. While it isn’t a major flaw, if you’re prone to swapping out gear frequently it may become an annoyance. Immediately to the right of the memory DIMM’s is an IDE, Floppy and ATX Power connector. These are nicely situated to the leading edge of the motherboard to prevent fouling of any cables.
Â
Â
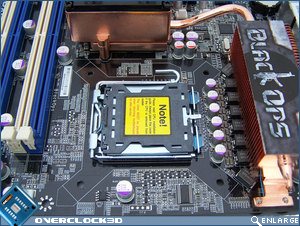
Heading across the top of the motherboard to the CPU socket, we can see what can only be described as the cleanest socket area that I have ever seen. It is exceptionally spaceous and uncluttered. There’s more than enough room in here to accommodate the largest of CPU coolers, waterblocks/DICE slug/evap head. I tested the socket area with the largest CPU cooler at my disposal – the Scythe Orochi, and there were no clearance issues to highlight other than the 4-in-1 cooler’s height reduces the orientation possibilities of the cooler.
Â
The Foxconn BlackOps uses an 8 phase PWM which promises robust power delivery. It will be interesting to see how the 8 phase PWM compares to the ASUS Rampage Extreme’s 16-phase PWM when it comes to testing time. Not surprisingly, the BlackOps utilises a Volterra 1115MF PWM controller and accompanying Volterra MOSFETS in an 8-phase delivery configuration to supply processor power. DFI also use Volterra MOSFETS, but the ones used here are almost double the size of the ones we are used to seeing on DFI’s boards, and are no doubt a lot more expensive. In order to get the most out of the Volterra MOSFETS they need to be adequately cooled to cope with the voltage that this board promises. The PWM cooler to the left hand side of the CPU socket is a bolt-through affair with backplate, and should ensure that optimal contact and heat transfer occurs.
Â
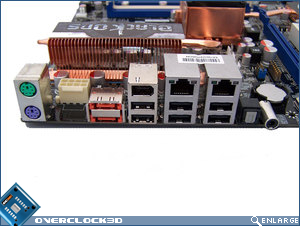
Heading back around to the rear of the motherboard, the Foxconn BlackOps I/O area has been issued with a total of six USB 2.0 ports, two eSATA ports, two Gigabit Ethernet ports, one IEEE 1394 and a legacy PS/2 keyboard and mouse port. The Foxconn BlackOps also provides an Optical S/PDIF Out and Coaxial S/PDIF Out connectors. Audio duties are handled courtesy of the Sonar Daughter-board which plugs into the HD Audio header to the left of the battery holder.
Â
Â
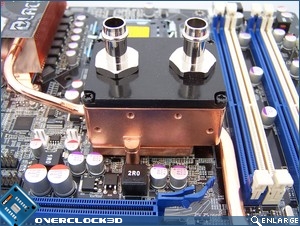
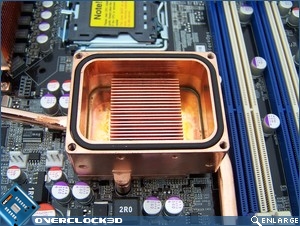
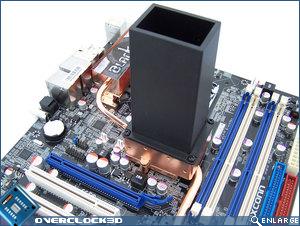
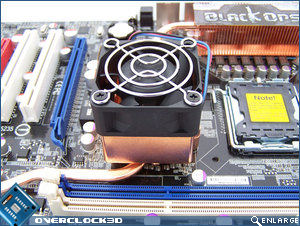
One of the biggest drawcards of the Foxconn BlackOps is the 4-in-1 cooler. The 4-in-1 cooler provides cooling to the X48 North Bridge in a way that can only be described as pure genious. I don’t know why it hasn’t been implemented before. The copper block that forms the base of the 4-in-1 cooler is something special to behold and looks like it was manufactured in god’s own machine shop. The block can be used in a passive capacity, or you can whack on the included 40mm fan for an active cooling solution. Thought has even gone into the fan that Foxconn included; instead of an average whiny 40mm fan a 20mm thick one with sizeable blades has been used.
Â
Should you prefer to water-cool your Northbridge as part of a water-cooling loop – no problem. Simply whack on the water-cooling top and your barb of choice (3/8′ or 1/2′) and away you go. For those who prefer even more extreme cooling measures, by simply screwing on an appropriately-sized rectangular pot, the North Bridge cooling solution is ready for dry ice.
Â
Â
So that concludes our trip around the Foxconn BlackOps layout. If you would be so kind as to return your tray to the upright position, and make sure that your onboard luggage is stowed securely under your seat; we will be making our landing in the BIOS on the next page…


